Modding Guide
Preliminaries
I’ll be updating this as time goes on. I’ll get turned into its own article eventually with a live version in the modding area of the forums.
-
To use mods, you need to go to the Options dialog and turn on “Use Mods”.
-
Get familiar with this directory:
-
The documents\my games\fallenenchantress\mods directory is read in by the game.
The Tools
On the main menu is the “Workshop”. This is the gateway to the modding tools. The tools we include in game are:
-
Builder’s Forge
-
Cartographer’s Table
-
Particle Cauldron
-
Faction Creator
These tools will be in a perpetual beta as we plan to provide regular updates but we don’t have any plans to encourage casual players to make use of them.
Understanding objects
It will help you if you forget that Fallen Enchantress is a fantasy strategy game. Instead, think of Fallen Enchantress as being a particular “Mod” of a game engine called Kumquat (I didn’t name it so don’t yell at me <g>). We could just as easily have made a Baldur’s Gate style game with it. Or more specifically, YOU could make an Ultima style game. Or a Civilization style game.

With this understanding, let’s talk about what ties them together: XML
That is, all of these tools do is create .XML files. We use PNG for most graphics (we do use .DDS as well which is another graphics format).
The Builder’s Forge

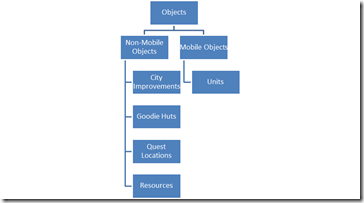
The Builder’s forge is there to create non-mobile objects. For our purposes, we’ll call these “Tiles”. The left mouse button selects and places. You can move the view around with your middle mouse button.
When you save the tile, it is placed in the \documents\my games\fallenenchantress\tiles directory. A tile includes an XML file and a shadow PNG.
A tile, on its own, is just eye candy. It’s what you do with it that matters. That brings us to…
The Map Editor

This is what it looks like if you select the cartographer’s table. There are generally 3 things you can make with this.
- Custom Maps
- Tactical Maps
- Stamps
Making a Custom Map
The basics of a custom map are as follows:
- Make sure there are some starting locations
- Make sure there are enough decent places for people to settle.
Someone could make a Civilization style map where everyplace is settleable.
Left-click to select a type of tile and right click to set it. You can click and drag some things (like mountains) to go nuts with it.

Different types of terrain tiles

Different types of objects

We don’t really use triggers in the sandbox game. But in the campaign, we use them everywhere. A trigger is specifies a condition in which an event is launched. A typical one would be to have tiles marked as triggered and if hit, it then tells the game to open up a cut scene or start a quest or spawn monsters or something.

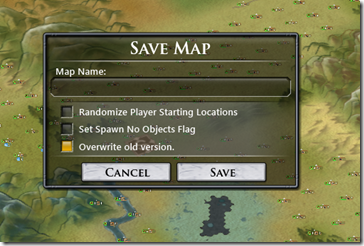
When you save a map, you can specify it not to create any objects for you. If you’ve created the perfect map with every resource placed and every NPC placed just so, then select that option. If you want the game to go ahead and randomly spawn the resources for you, then don’t check that option.
Making a tactical map
A tactical map is a special type of map that the player is sent to under specific circumstances (a tactical battle for instance)

Like strategic maps, modders need to tell the map where players are going to start out at with their units. Tactical maps tend to have (as you can see in the screenshot) a lot of blocked tiles. That’s because most of the tiles you see are simply decorations and as such, need to be flagged as untouchable.
One thing to note is that Kumquat doesn’t yet support blocked tiles in terms of weapons. That is, putting up a wall won’t stop a unit’s ranged weapon from going through it. So cosmetically, don’t put up a wall expecting it to block line of sight or weapons. This is something we hope to change in a future version.
Making a tactical map, on its own, won’t buy you much. It has to be connected to something to be used.
With custom maps, players can explicitly load them at the start of the game. But with tactical, they have to either be connected to a triggering event of some kind (like a quest or goodie hut). We don’t currently support generically pulling in unspecified tactical maps.
Making Stamps
Stamps, are used by the random map generator. We wanted to give modders a way to contribute to the post-release map generation experience. And so stamps were born.
Here’s how they work:
You create a piece of a map. Maybe it has a starting location on it. Maybe it doesn’t. It can be big or it can be small.

You are better off making the stamps fairly small so that they’re more likely to be chosen (huge stamps may have a hard time fitting into a given world).
Once you’re done, choose the magic wand tool. Select a tile and it should select all of them. Then select the selector tool (the arrow tool) and then using the Ctrl key LEFT click on each tile you want to de-select. This is the fastest/easiest way to do it I’ve found. Specifically, you should generally de-select cliffs and beaches (anything on an ocean) because otherwise, your stamp will only be selected when it’s trying to find an ocean sided stamp and that could be pretty rare.
Once you’ve done that, select “Save Stamp” from the top.

In the Save Stamp area, you need to choose which type of map it’ll be used with. Tiny, Small, Medium, or Large. This sets the minimum map size that the stamp requires.
The file gets saved to the stamps directory in your \documents\my games\fallenenchantress and the game will pull from it as long as “use mods” is on. Make sure you choose the frequency you want it to show up on. If it says “no inclusion” it means it won’t use it unless it gets explicitly specified elsewhere (like a spell). I’d recommend “common” for most stamps.
Testing your stamp
To test your stamp, you’ll need to open it up in a text editor. There will be a tag called “frequency”. Set it to 5 (remember what it was previously). This will make it show on on a given map size for certain. DO NOT share stamps like this.

I try not to think about the stamps users are going to share. It’s too disturbing. 
Up Next…
Goodie Huts
Quests
Monsters

